Showing posts with label swift. Show all posts

Thursday, February 04, 2021

Flutter vs SwiftUI

It's a new year and time to make a new app.

So what do I build my new app in? SwiftUI or Flutter?

TL;DR - I'm making my new app in Flutter.

I arrived at this decision by making a vertical slice of the app using SwiftUI,  Flutter and standard Swift with SpriteKit.  

The app I'm building is an update of my Brainiversity brain training game. Brainiversity has a number of small games that test your math, memory and word skills. I've been making versions of this app since 2007, so I have code bases written in C++, ActionScript and Lua. I used the existing "Add It Up" mini-game for my vertical slice.

Swift and SpriteKit
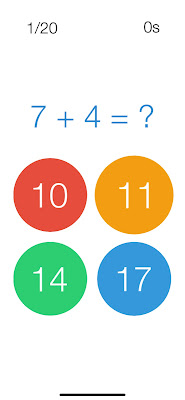
Line count: 647
SpriteKit version

This version is very similar to the original C++, ActionScript and Lua versions. It uses sprite animations to give the game zing, and everything is imperative - so the text in the answer counter label in the top left of the screen is manually updated when a new question is generated. 

I found SKAction  was useful in handling animations. This made it really easy to chain together a sequence of events like:
  1. a cross appears when the user presses the wrong answer button,
  2. the correct answer scrolls in from the right of the screen,
  3. after a pause, answer counter pulses as it counts up one,
  4. the answer scrolls off screen to the left as a new question scrolls in from the right
  5. the buttons flop over to reveal new answer values.
Compared to the SwiftUI and Flutter versions, there was a lot of code to make stuff happen, and to be honest, after making apps with reactive UI, programming this way felt old fashioned.

SwiftUI

Line count: 210
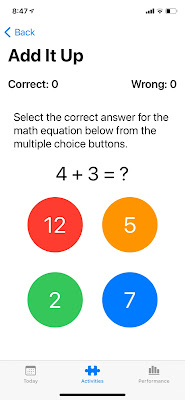
SwiftUI version

I've already made a few apps in SwiftUI so I was used to the reactive paradigm. Reactive programming results in reduced code which makes reading the code so much easier. I love how SwiftUI handle state with the @State property wrapper - it seems a lot cleaner and less code than Flutter's SetState or Provider solutions.

The use of VStack, HStack and Spacer makes it really easy to lay out the screen. Here is the code to layout the question and the answer buttons.

   VStack {

      VStack {

        HStack {

          Text("Correct: \(correct)")

            .bold()

            .font(.system(size: width * 0.20))

          Spacer()

          Text("Wrong: \(mistakes)")

            .bold()

            .font(.system(size: width * 0.20))

        }.padding()

        Text("Select the correct answer for the math equation below from the multiple choice buttons.")

          .font(.system(size: width * 0.20))

          .padding()

        Text(question)

          .font(.system(size: width * 0.35))

        VStack {

          HStack {

            Spacer()

            RoundButton(title: "\(answer1)", color: Color.red, size: width, function: {tryAnswer(button: 1)})


            Spacer()

            RoundButton(title: "\(answer2)", color: Color.orange, size: width, function: {tryAnswer(button: 2)})


            Spacer()

          }.padding()


          HStack {

            Spacer()

            RoundButton(title: "\(answer3)", color: Color.green, size: width, function: {tryAnswer(button: 3)})


            Spacer()

            RoundButton(title: "\(answer4)", color: Color.blue, size: width, function: {tryAnswer(button: 4)})


            Spacer()

          }.padding()

        }

      }

      Spacer()

    }

    .navigationTitle("Add It Up")

    .onAppear {

      generateResults()

      width = UIScreen.main.bounds.width * 0.3

    }


This is fairly similar to Flutter, which uses Columns, Rows and Spacer - here is the button section code in Flutter:

return Column(
children: <Widget>[
Row(
mainAxisAlignment: MainAxisAlignment.center,
children: <Widget>[
answerButtonRound(
answer: answerList[0],
color: Colors.green,
size: buttonSize,
func: () => {_answerButtonPressed(buttonNr: 1)}),
answerButtonRound(
answer: answerList[1],
color: Colors.blue,
size: buttonSize,
func: () => {_answerButtonPressed(buttonNr: 2)}),
],
),
Row(
mainAxisAlignment: MainAxisAlignment.center,
children: <Widget>[
answerButtonRound(
answer: answerList[2],
color: Colors.red,
size: buttonSize,
func: () => {_answerButtonPressed(buttonNr: 2)}),
answerButtonRound(
answer: answerList[3],
color: Colors.orange,
size: buttonSize,
func: () => {_answerButtonPressed(buttonNr: 4)}),
],
),
],
);

Swift code is definitely a lot cleaner to read with less nesting and less boiler plate. The child and children parameters of Flutter take up extra space and cause more visual clutter.

I hit a brick wall with SwiftUI when I wanted to chain animations together with some state updates in the midst of all the action. I could not find a way to make the question label animate away, then update the state for new questions, then slide an updated question text back on screen. The best answer I could find was to start the slide out animation with a slide in animaion, then set a timer to call my generateNewQuestions() function so it occurred halfway between the slide in and out.

Maybe I didn't look hard enough for the right way to do this, but that's currently an issue with SwiftUI documentation. There's not much of it out there. Whereas I found multiple examples and tutorials on how to do what I wanted in Flutter on flutter.dev and other web sites.

Swift Pros

  • Light weight code that is easy to read. You can do a lot with so little.
  • Dark theme just works out of the box.
  • I can target Apple Watch.
  • CoreData is nice and works out of the box with Apple devices.
  • The state system is really easy to use.
  • No semi-colons!

Swift Cons

  • App Preview is slow to update, even on my M1 MacBook Air - and I constantly had to keep hitting Resume to rebuild the preview.
  • Documentation is lacking, especially compared to Flutter. Thank goodness for Hacking With Swift - the best resource for Swift developers.
  • Can only make apps for the Apple ecosystem.
  • Refactoring is less advanced than Flutter.

Flutter
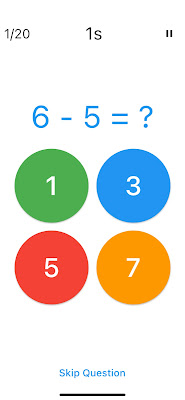
Line count: 304
Flutter version


Even though Flutter has sightly more boilerplate code to set things up, I like how everything is a widget and it's pretty consistent. You generally nest widgets within widgets - and when you go too deep you refactor out into new widgets which makes for easier to read code. SwiftUI has nesting as well, but also has modifiers which I'm not 100% sold on.

In SwiftUI to make the text bold you add a .bold() modifier.

          Text("Wrong: \(mistakes)")

            .bold()


In Flutter you add the bold as part of a parameter of Text.

                        Text('Wrong $mistakes', style: TextStyle(fontWeight: FontWeight.bold)),

I guess what feels weird with SwiftUI modifiers is that to give a screen a title, you add the modifier at the bottom of the view - so when you read the code you aren't seeing the layout as it occurs. Whereas with Flutter, you add the screen title at the top so you read the screen in the order it's drawn. Maybe I'm being picky, but I found that a little weird.

Even though Flutter is a bit more wordy, I found it a lot easier to find out what modifiers are available by simply pressing CTRL-SPACE in VSCode. Maybe there is an easy way to find out what  modifiers are available for Text() in Xcode apart from going into the Library Panel and searching (which is a pain) - but I have yet to find it.

Another plus with Flutter is that it's so easy to refactor code. Are your widgets nested too deep? Turn them into a new reusable widget by hitting Refactor and choosing Extract to widget. Want to wrap everything in a new Row? Hit Refactor and choose Wrap with row. Want to get rid of a top level widget? Again, hit Refactor and choose Remove this widget.

Xcode has a refactor option, but doesn't offer as many features. 

In terms of Dart vs. Swift - I have to admit I found them fairly interchangeable and could happily switch between the two. Most of the stuff I am using to build my apps is common across both. All the modern language features like helper functions for lists such as sort, insert, and index functions were common to both and in many cases had the same name.

Flutter Pros

  • Hot reload is amazing. Instant updates on my actual target device makes development so much faster.
  • Great documentation. Not only is the documentation at Fluter.dev awesome, but there is a dedicated YouTube channel with lots of content including the useful Widget of the Week.
  • Lots of great packages at Pub.dev. The odds are, if you need something, there is a package already available. Want to add charting to your app? There's are many packages for that.
  • There is a Widget for literally everything. 
  • Refactoring with VSCode is super easy.
  • Supports a lot more legacy devices and older OS versions.
  • Can make apps for iOS, Android, Mac, Windows and web. My website, www.redspritestudios.com is written in Flutter :-)
  • Flutter is open source. So you can drill down into any piece of code to see how it works. There is no blackbox like Swift.

Flutter Cons

  • Can't build for Apple Watch :-(
  • 2D only. So no chance of doing any activities in 3D.
  • Slightly more verbose compared to SwiftUI.
  • State management is not as clear cut as SwiftUI.
  • I have to type a semi-colon at the end of every line.

Conclusion

I love SwiftUI and have already published apps built with SwiftUI. 

But, for my new app, Flutter has the edge. It has lots of widgets, a large amount of good quality documentation, cross-platform support, and an animation system that does what I need.

More importantly I actually found it a tad faster to build my vertical slice in Flutter. This was probably due to the abundance of quality documentation helping me solve roadblocks quickly, and having a faster feedback loop with hot-reloading.

I plan to get an MVP of the new Brainiversity up as soon as I can, and I will build out the rest of the activities with feedback from users. I'll post again when it's ready to play.

Let me know if I got anything wrong, or if there is a better way of doing things.

Cheers,
John


Monday, August 26, 2019

Third In The Space Watch Trilogy

WatchOS 6 is launching soon, and I've been busy preparing some new games exclusively for the Apple Watch.

I've already released Kepler Attack, a fast paced space shooter inspired by the arcade classic Gyruss, and I've recently completed Star Warp, which is now available for pre-order on the App Store. Star Warp will launch on the 4th of September and is inspired by Galaxians.

And right now I'm busy working on another space game -  the third in my Space Watch Trilogy - and that game is called Asteroid Commando. No prizes for guessing the inspiration for this one...


Like the other two games, Asteroid Commando is built using Swift 5 and SpriteKit and is designed to take advantage of all the latest features of the Apple Watch. It uses the Digital Crown with haptic feedback, runs at a silky smooth 60fps, works with Game Center for the Watch and runs independently of the iPhone.

I've built up a framework while developing Snappy Word, Kepler Attack and Star Warp - sharing a menu system, leaderboard and save/load system between games lets me kick off new projects and get into the core game a lot faster.

Initial sprite set for the game
I'm finding the constraints of the Apple Watch a joy to work with. The smaller screen size and limited input, coupled with the shorter play sessions means that a Watch game is much smaller in scope than the average mobile game. And this means shorter development times without compromising the quality of the experience. In some ways, the Watch is a great delivery platform for what is essentially paid hyper casual games.

I plan on doing more regular updates as I close out Asteroid Commando, so please check back to see the new features I'll be adding over the coming weeks.

Cheers,
Johnno


Thursday, December 29, 2016

Christmas Projects

Christmas holiday time is a great time to relax and take your mind of work or school.

It's also a great time to look into  new hobbies, read new books, learn new stuff or catch up on those TV shows and movies that you may have missed out on.

One of the things I love to do is to use the time to work on a small project. The original TY the Tasmanian Tiger game began as a Christmas project way back in the early 2000's. I did the initial prototype programming while Steve Stamatiadis did the art for the in game characters including TY. But that's a blog post for another time!

This year I got a Sphero BB-8 for Christmas and my son got a Force Band to use with his Ollie that he got last Christmas. The Force Band works amazingly well with both the BB-8 and the Ollie. Being able to control your droid using simple hand gestures is the closest feeling you'll get to using the Force. It truly is amazing.

Being a huge fan of the Apple Watch I decided to start a Christmas project to make my own Force Band for my Watch.

The Sphero SDK is freely available for all platforms and is fairly simple to integrate into an iPhone Xcode project.  I found a great sample project from Robotics Trends that used the Watch's accelerometers to control a Sphero. This is a great entry point!

Trying out different control methods for BB-8 with Apple Watch
However I decided to start fresh and explore some other input methods that the Watch offers.

I tried using buttons and swipe controls to move BB-8 - all of which work okay, but the one I found interesting to explore is the use of the Digital Crown as a steering wheel.

This actually feels great having BB-8 move while rotating the crown to steer the little droid. I have a few extra features to add, such as a simple way to slow down and speed up the droid - and the UI could use a little love :-) 

Speaking of which,  I better get back to my Christmas project so my son and I can take our droids on adventures with the Force Band and Apple Watch.

I hope you all have a happy new year!

- Johnno


Friday, December 16, 2016

Making Snappy Word

Snappy Word just relaunched exclusively on the App Store.
You can get it here!

I originally made Snappy Word at Right Pedal Studios as a launch title for the Apple Watch. When Right Pedal wrapped up the game was removed from the App Store. However Steve Baxter (visionary investor, awesome guy and a great boss) was kind enough to let me have the game IP.

I planned to relaunch the game as at it was but Apple had released some cool new stuff with Swift 3, WatchOS 3 and the new iMessages app ability. So I decided to do a major overhaul.

I rewrote a lot of the code to be in Swift 3. I updated the WatchOS version to use WatchOS3 and run as a seperate app without the need of an iPhone. I added an iMessage app extension so the game could be played within iMessage against friends.

The original version had a multiplayer element that used Game Center. This never worked well as Snappy Word is a very niche game and the multiplayer required you to find someone online at the same time also looking for a match. Finding someone to play against was like trying to find a needle in a haystack, so moving the multiplayer element into iMessages and making the game turn based was a no brainer.

The original art had an angular look to it to help it stand out from other tile based word games. This art was done by the talented Rupert Lewis Jones:

The original main menu screen with angled tiles.

The Watch version actually had rounded tiles so I decided to embrace that look in the iPhone version to maintain consistency. I also converted a number of options from words into icons. Most mobile game players understand the iconography of leaderboards, settings and play images.

The new look main menu screen with rounded tiles and icons.
I also updated the game screen to use the rounded tiles.


Original Snappy Word game screen.
New Snappy Word game screen.
In the original game I used interstitial pop up ads that appeared after every 3 play sessions. These were invasive and broke the game flow. So with this update I added an AdMob banner to the top of the screen and removed the interstitials.

I felt this was a good compromise to keep the game free and have some monetisation while not being in the players face. If they really hates ads then they have the option to spend 99c to remove them.

I did some minor rejigging of the Watch graphics, but the biggest improvement came in terms of a speed boost from switching to WatchOS3. The game responds really well to the button presses, something that was a little slow in the previous WatchOS version. I also included GameKit so it didn't need to rely on the iPhone to get and set high scores.

There were a few things I would love to have spent more time on, but the reality is that this sort of game won't set the world on fire in terms of sales so there was a practical limit on the time I could  spend on it. As it was I spent more time than I had planned as learning Swift3, WatchOS3 and the iMessage framework took a lot of effort.

I used swipe controls to select letters on the iPhone version but relied on button presses for the iMessage and Watch versions. To get swipe working in these would have required a few major changes that I couldn't justify in terms of time. It is a little jarring to have two different input styles, and as a designer I know it should be all the same - but given the constraints and my belief that people will probably only play on one platform, ie. iMessage only, or Watch only, I don't think it's too big an issue. If people demand it, I will fix it in a later update :-)

The awesome tutorials from Ray Wenderlich were invaluable in helping me learn the skills necessary to make this game.

My main resources from Ray Wenderlich were:

iOS 10 by Tutorials - Helped me build the iMessage app extension
WatchOS by Tutorials - Got me up to speed with WatchOS3
2D Apple Games by Tutorials - Helped me with Swift3 and SpriteKit

The game has done well on launch and has been featured in the app and iMessage games sections of the App Store around the world.
Featured in New Games We Love

So far it's been featured in over 97 App Stores which is not bad for a game that is targeted at English speaking players.

Also featured in the iMessages App Store
Now, with Snappy Word done it's full steam ahead on my next game, the 3D action racing game called Billy Carts that I'm making with the awesome Pete Mullins. This is an Aussie game featuring outback landscapes, Aussie animals and lots of destruction! 

I'll be blogging about it's development over the coming months so please check back with me to see how it progresses.

Cheers,
Johnno


Thursday, December 08, 2016

Gotta know when to hold 'em, know when to fold 'em, know when to walk away

Steve Jobs famously said "Focusing is about saying no."

I've been thinking about this quote a bit lately. Like many game developers I have a number of games I want to make. And like many game developers I've even started building some of these games.

I had been developing a prequel to my classic adventure game Flight of the Amazon Queen as an Apple Watch game. I love my Apple Watch and love adventure games. With titles like Lifeline doing well it seemed like an opportunity to do something in that space.

The game, creatively titled Return of the Amazon Queen, was shaping up to be an interesting adventure. I had the idea for it, and I said "Yes, I'm going to do this." In reality, I should have said no. The audience for adventure games lives on the PC. As much as I love my Watch, the audience for the game on the Watch was probably going to be me - and I already know how to solve all the puzzles!

Return of the Amazon Queen on Apple Watch

As well as the Amazon Queen prequel I had also developed a 2D endless runner in Swift. The game is 90% done, meaning the remaining 10% will take at least 90% of the time I already spent on it to actually wrap it up. It's the seemingly little things like ad networks, leaderboards, testing, etc. that take up way more time than people think.

A character from the endless runner made with programmer art!

While the game was fun to play (for me at least) it didn't get the reaction from family and friends that I had hoped for. They tended to play it for a bit then politely return the phone back, or switch to another game (never a good sign!). I could try and fix, but the reality is the style and mechanic, and the fact that it is 2D, are all factors keeping it from greatness.

So, I've folded these two games in order to focus on Billy Carts, a game that has already elicited more excitement from those I've shown it to than my previous efforts.

There is always that sense of duty to finish what you started, and that's a great thing to help you keep focused so you actually ship your game. But sometimes its best to put that game aside, write of the sunk cost of time and effort, and focus on the better idea.

The good news is that the time I spent on those two unfinished games only helped me become a better programmer and designer. I managed to get experience with some new frameworks that will carry over into Billy Carts.

Remember, even if you do say yes, it's okay to say no later and walk away if you really believe that that is the best thing to do.

Time is precious and as indie developers it's important to make stuff that isn't just okay but is great. We're doing this because we love what we do. We are fortunate that we're not a cog in a big publisher driven machine making some licensed game for a pay check. We're in control, and sometimes we may get a little out of control, but ultimately we have the power to say no and make things right.


Friday, December 02, 2016

No matter what you do it will take a lot of work

I've just wrapped up an update to my iOS game Snappy Word. It's a word game built in Swift for iPhone, iPad, Apple Watch and iMessage.

Snappy Word


I originally wrote the game for Right Pedal Studios back when the Apple Watch came out. The game was one of the launch apps and I'm quite proud of being there at the beginning.

I was lucky to get Snappy Word assigned to me when Right Pedal wrapped up, so rather than ~re-releasing it I decided to do a major update. This meant making it work with Swift 3 and the latest WatchOS, adding in an iMessage version, redoing the art and adding in a new game mode.

Despite it being a fairly simple 2D word game the rewrite in Swift 3 and the addition of new frameworks ended up taking a few months of part time work to finish.

But I learned an important lesson doing this update:
No matter what you do it will take a lot of work.

I've already started my new game - a cool 3D game built in Unity with my mate and talented artist Pete Mullins.

Billy Carts made in Unity

The amount of work to get the initial 3D game up and running was probably a little less than it took for me to wrap my head around the iMessage framework. But showing the 3D game to friends got oohs and aahs. This was a "real" game.

This game is definitely a leap ahead of my previous stuff, and yes, it will take a lot of work. But you know what? I'm really looking forward to putting in that work because this time the effort is going to show on screen.

As I've learned everything takes effort so you might as well go for gold :-)